

Motion engineering is the way to make motion video through technique instead of instinct: you assign frame numbers to each event (tag appears, pointer clicks, result shows up), write them into a summary, then let Claude Code (Anthropic) write Remotion code to build it exactly that way. According to @beamnxw (post on X on 9/10/2026, over 499 thousand views on X), with Claude Opus 5.5 one person can do the whole workflow of a small motion design studio, from analyzing reference video to delivering a 20-second product launch clip. This post rewrites that guide in Vietnamese, with illustrations from the original post, and compares Remotion commands with official documentation dated 23/10/2026. The content goes through four parts:
- Analyze reference video and write a BRIEF.md summary.
- Build, check still images and edit by frame number.
- Set up tools, export film and read metadata.
- Package Launch Clip with a sample price of $150 for illustration only.
For example, a 20-second clip at 30 fps has exactly 600 frames, so each event gets its own frame number.
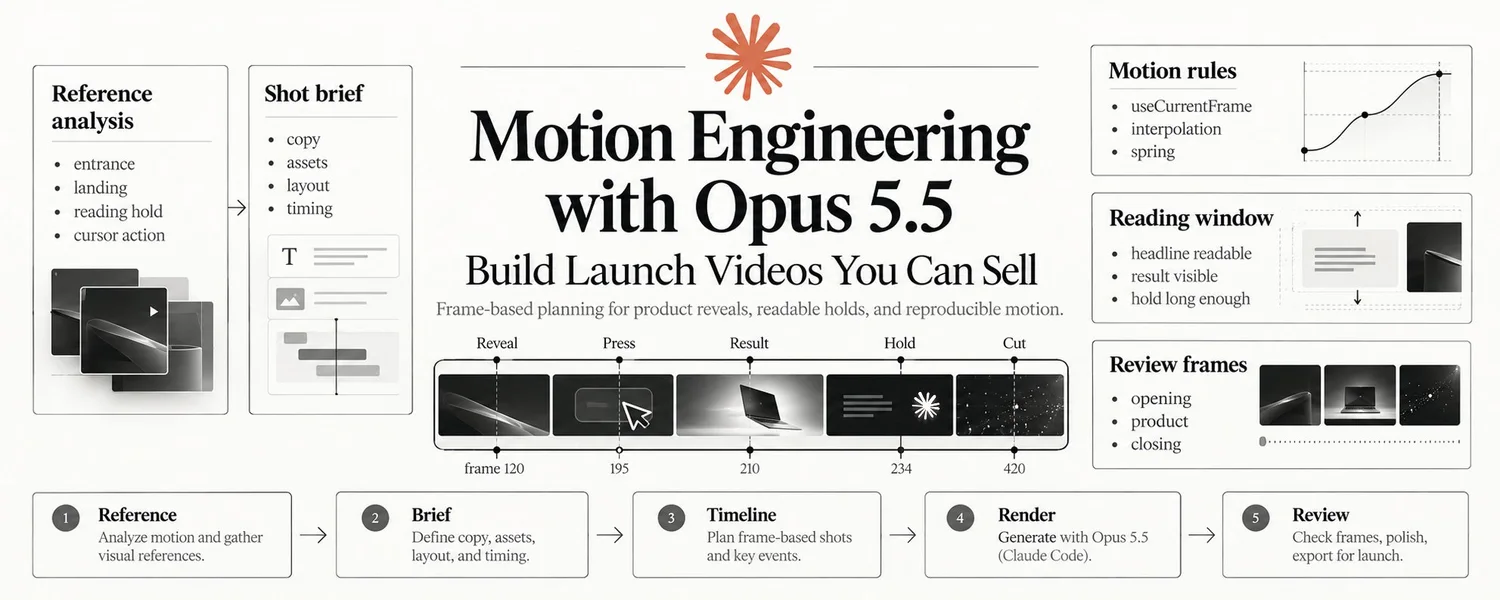
The five-step process of the original post: reference, summary, timeline, build with Opus 5.5 in Claude Code, check. Image: @beamnxw.
What is motion engineering and why does it fit with AI?
Motion engineering is the way to describe movement in numbers: when does the tag tap down, when does the product respond, how long must the title be readable. Each number ties to its own frame number, so fixing one spot doesn't break another. Because everything is text, Claude reads, measures, fixes and rebuilds it; this is also why the original post calls it "technique", not "style".
The original post opens with three principles: tell Opus when the tag must tap down, when the product responds, how long the title stays readable; assign frame numbers to each step (appear, enter scene, hold to read, pointer clicks) so you can fix each step alone; and with a short film built around one product action, keep words, assets and movement choices in one summary. Opus 5.5 launched on 22/9/2026; Anthropic calls this their first Claude 5.5 model, giving results at Claude Fable 5.1 level on most tasks and cheaper than Opus 5 by around 40% (announcement on X; compare Anthropic page).
What Should a Reference Video Be Assigned to Do?
Each reference should answer only one question, for example how a dropdown card settles into place, how a scene transition keeps a product in frame, or how a cursor makes a result appear clearly. You are not copying that scene, but extracting reusable decisions: how the product enters the scene, what moves first, where the viewer's eye stops, how long the result is held.
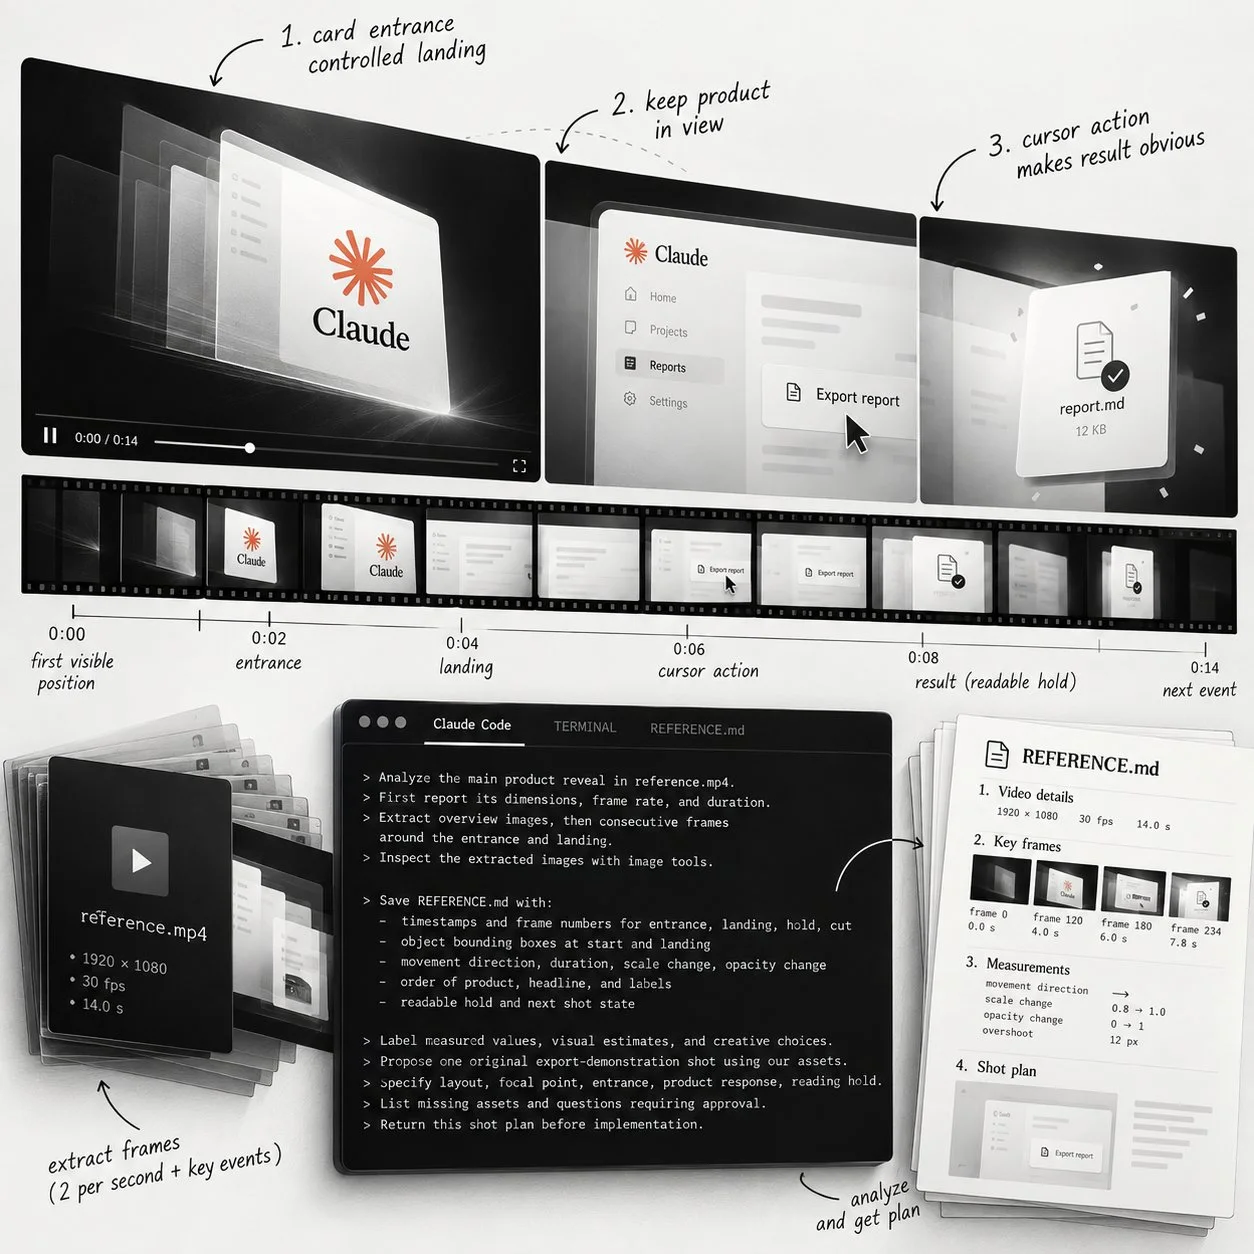
Extract frames from reference.mp4, then have Claude write REFERENCE.md noting timecodes, bounding boxes and order of appearance. Photo: @beamnxw.
How to do it following the original article:
- Extract frames from the reference video, about two images per second to get an overview, then pull consecutive frames around important events.
- Paste a prompt into Claude Code (video at
reference.mp4) asking to measure dimensions, frame rate, duration; note in, settle, hold and cut timecodes; record object positions; and separate measured values, eyeball estimates and creative choices suggested. - Check important positions with extracted images, because according to the original article Claude's spatial estimates are only approximate. Claude's image handling guide is in the official documentation.
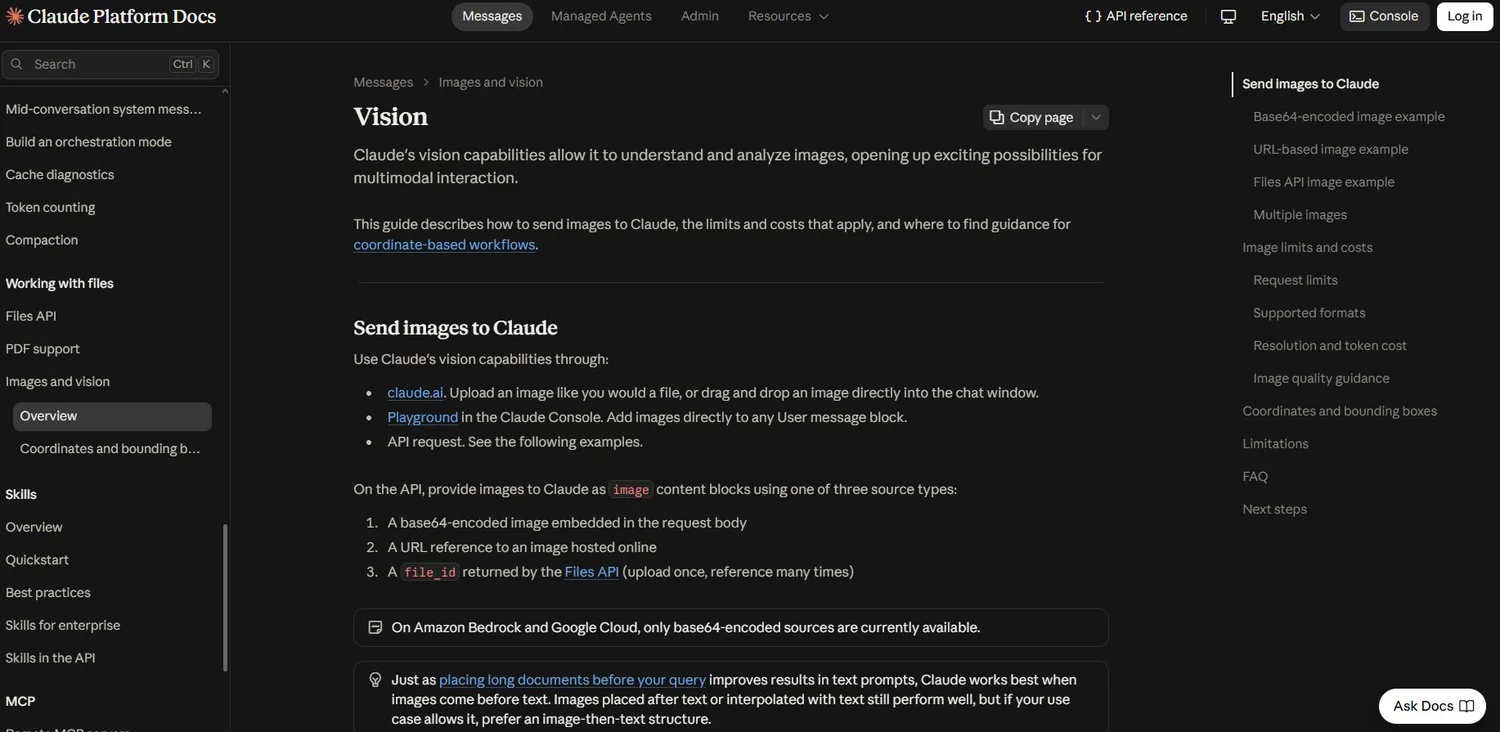
The instruction page for sending images to Claude that the original article links to. Photo: @beamnxw.
Condensed translation of the author's analysis prompt:
Analyze the scene where the product appears prominently in reference.mp4.
First report dimensions, frame rate and duration using available tools.
Extract overview images, then consecutive frames around the in and settle moments.
View the extracted images using image processing tools.

Save REFERENCE.md containing:
Timecodes and frame numbers for in, settle, hold, cut.
Bounding box of the object at the start and at settle (coordinates in original image).
Direction, duration, scale change and blur, bounce if any.
Order of appearance of product, title, subtitle.
Hold duration for reading and state when transitioning to next scene.

Record separately: measured values, eyeball estimates, suggested creative choices.
For uncertain values, note which frames need to be checked to verify.

Use our assets to propose ONE scene illustrating the action of generating a report on its own.
State layout, focus, how it enters, product feedback, time held for reading.
List missing assets and questions needing review. Provide the plan before building.
Write Each Scene Like a Chain of Events
A product scene needs to have an order the viewer can follow: initial state, cursor placed on button, tap recognized, then result appears. According to the original post by @beamnxw (9/10/2026), the example is the export report action: from full report, through button tap, to finished file, and that file must be held long enough to read the name. First is the timeline table for the example at 30 fps (frame equals seconds times 30); next are two things to remember: note the source frame rate for reference timecodes, and convert correctly, because half a second is 15 frames at 30 fps but 30 frames at 60 fps. Finally, use these values for the first preview, then adjust any sections that feel rushed or empty. Timeline table:
| Timecode | Frame (30 fps) | Event |
|---|---|---|
| 4.0 sec | 120 | Report appears, card settled |
| 5.0 sec | 150 | Cursor moves toward Export button |
| 6.0 sec | 180 | Cursor touches button |
| 6.5 sec | 195 | Tap recognized |
| 7.0 sec | 210 | Finished file appears |
| 7.8 sec | 234 | Result label fully readable |
| 14.0 sec | 420 | End scene begins |
What a BRIEF.md Summary Should Include
BRIEF.md is the file that holds every decision of the film so that each edit only touches one group of values. According to the example in the original post, it consists of the following sections:
- Objective: illustrate what product the report exports, who the viewer is, opening line (state result, maximum eight words), closing line (one next action and where to go).
- Delivery and assets: `Launch` composition, 1080 × 1080, 30 fps, 600 frames; logo, report screen, exported file screen, fonts, sound placed in `public/`; check asset sizes and font loading before proceeding.
- Layout: coordinates in pixels from top-left corner; background color, text, emphasis; 64 px safe margin; title box, product tag, layer order.
- Opening (frames 0 to 119): title enters in frames 0 to 18, tag enters in frames 18 to 42, use cubic ease-out curve, then hold still.
- Product (frames 120 to 419): tag continues to correct position, cursor moves to button, click at frame 195, result file appears at frame 210 and completes at frame 234.
- Closing (frames 420 to 599): cut to logo and closing line, fade in during frames 420 to 438, then hold.
- How to do it and check: dynamic values taken from `useCurrentFrame`, timing constants and layout exposed separately, random variants use fixed seed; build the opening phase first, export still images and preview, then wait for review before moving on.
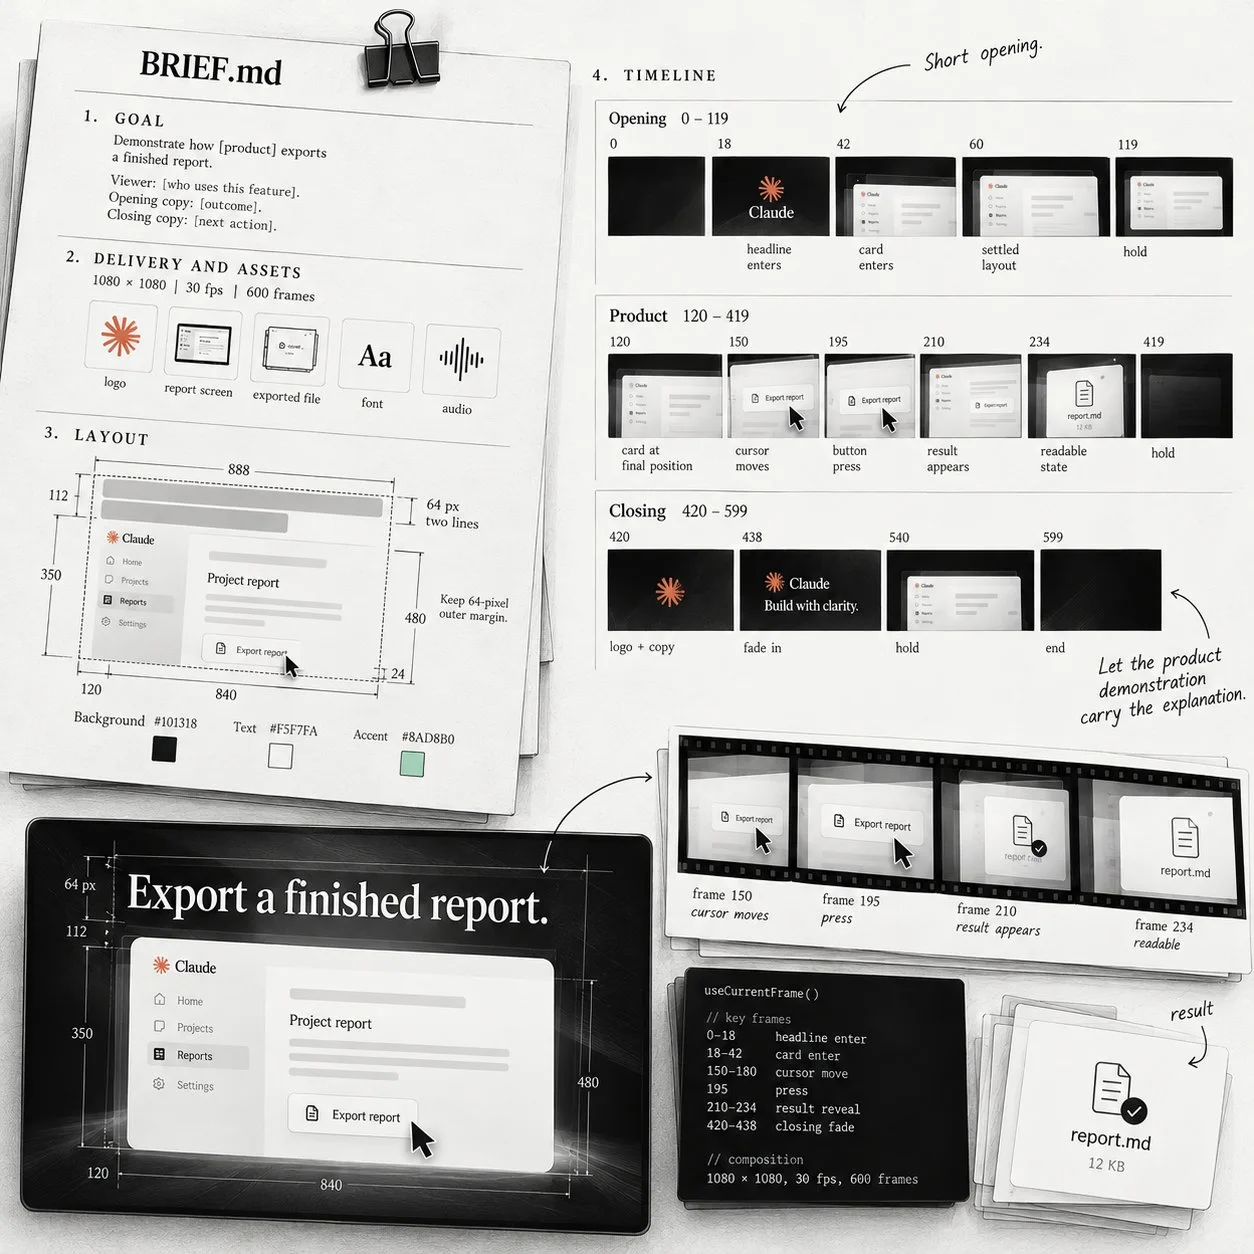
BRIEF.md of the original example: five decisions (objective, assets, layout, timeline, check) sit in one file. Photo: @beamnxw.
The original post emphasizes that coordinates, colors, and timing are only starting choices for this exercise and need to be checked against the real product screen. Use a short opening line and let the product demo carry the explanation; if the explanation needs many sentences, split it into a separate scene.
Check the Longest Copy Before Doing Motion
Check the opening layout using the longest title you plan to use. If it goes to three lines, stop the motion work: shorten the sentence, expand the text box, or move supporting information to another scene. Write down layout limits next to the styling section: title width, maximum lines, space for logo, end position of text and product tag. Check the actual font in your draft (weight, letter spacing); if you change the title, redraft the text box responding frame before viewing motion, and do the same with the call to action in the final scene when replacing a short product name with a longer one.
How to Make Every Frame Reproducible?
Remotion uses React components and the current frame number to draw the exact moment you choose, so the same frame always produces the same image. Three core techniques, cross-checked against Remotion documentation:
- Control by frame number: get value from `useCurrentFrame()` then interpolate or use `spring()`; avoid letting CSS transition run independently because it tends to flicker when building.
- Fixed seed for randomness: Remotion's `random()` function takes a seed; same seed then result is always the same, unlike `Math.random()`.
- Write time in seconds first, convert to frames after: 0.6 seconds is 18 frames at 30 fps; store offset, destination, duration and set shared response in one place so editing only touches one group of values.
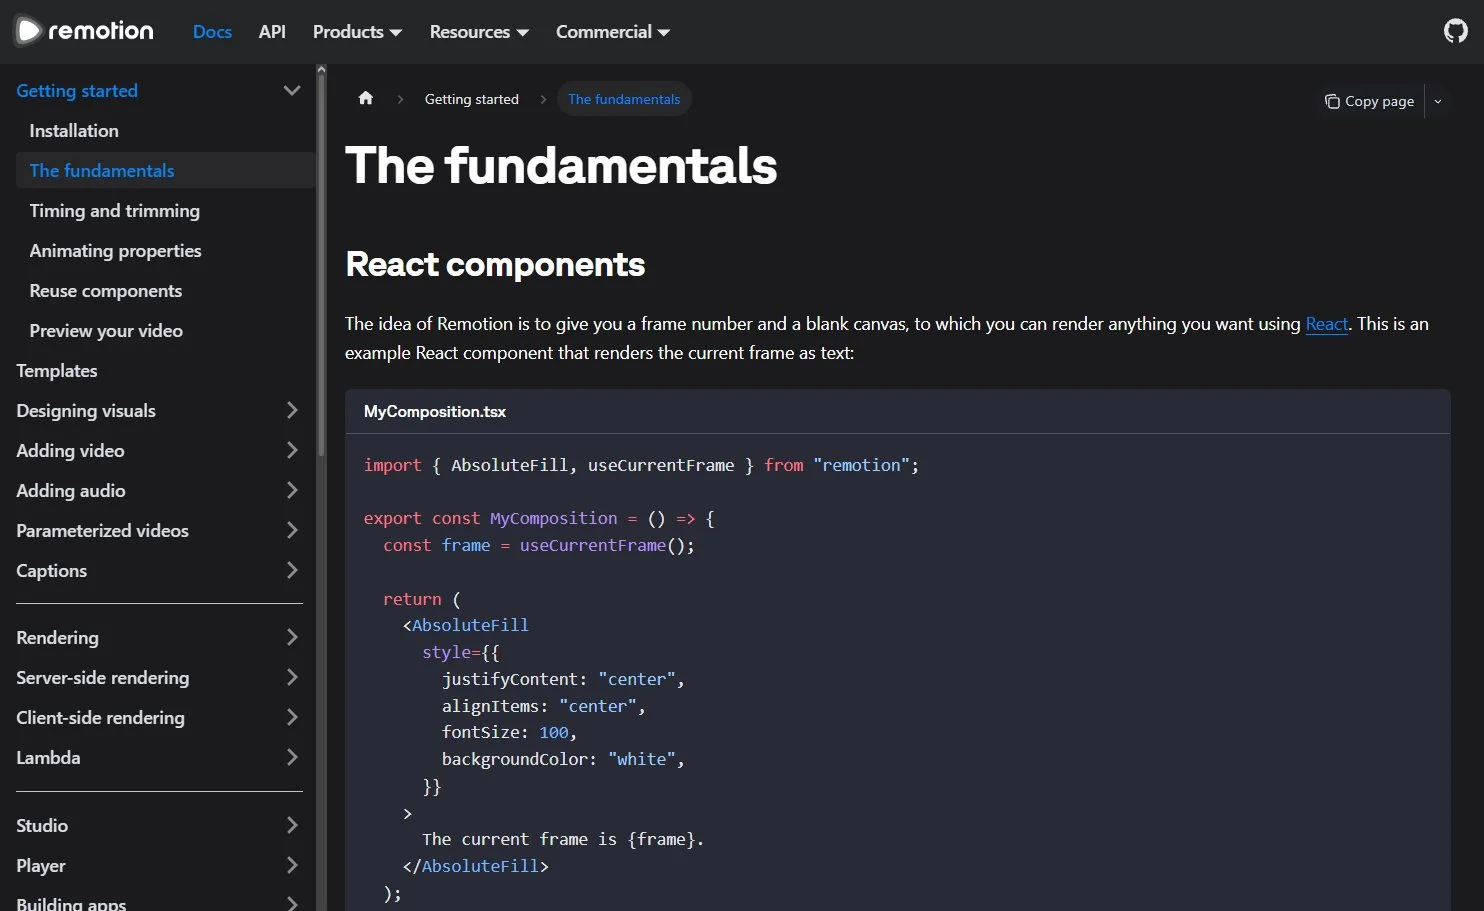
Remotion's fundamentals page: a React component receives frame number and draws everything. Screenshot: @beamnxw.
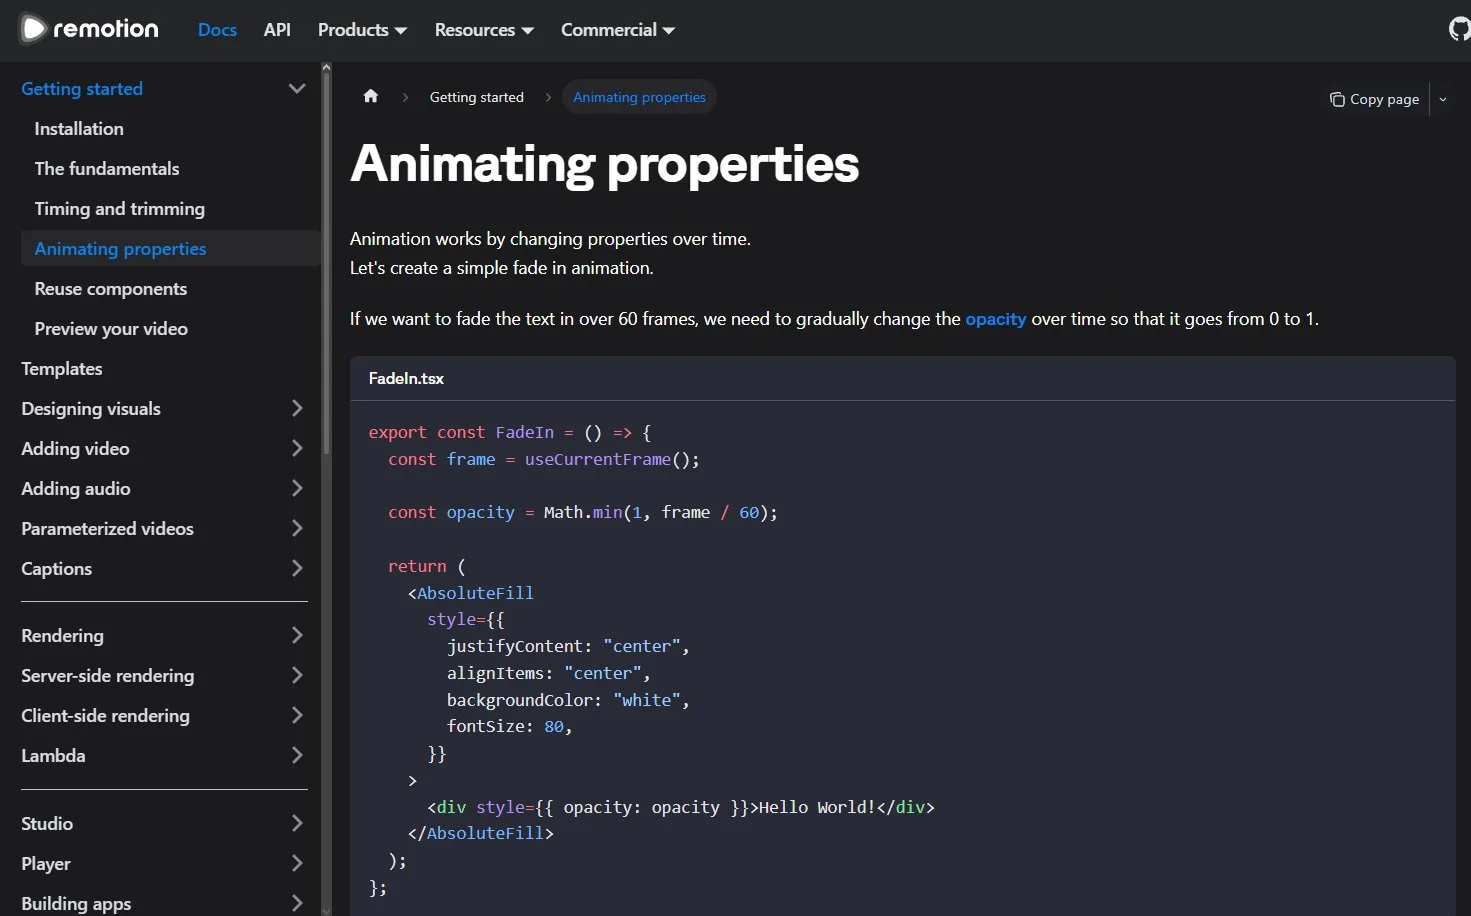
Animate properties by current frame number. Screenshot: @beamnxw.
What purpose does motion serve within the shot?
Each motion in a shot must have a job: entering the scene to introduce the main subject, holding so the viewer has time to read, pointing to indicate the next action, and transitioning to move the viewer to the next state. The original post laid out practical rules:
- Adjust
spring()with duration, damping, stiffness, and bounce; keep the destination fixed, change one parameter at a time and play it back. - Enter scenes in order: start with the main subject, secondary information enters after a small delay (try a 0.1 second offset between title and subtitle).
- Gentle push: for a subtle scaling effect, set the ratio from 1.00 to 1.03 over three seconds; continuously changing percentages will compound across frames.
- While holding to read: keep secondary motion smooth enough that text remains the focus.
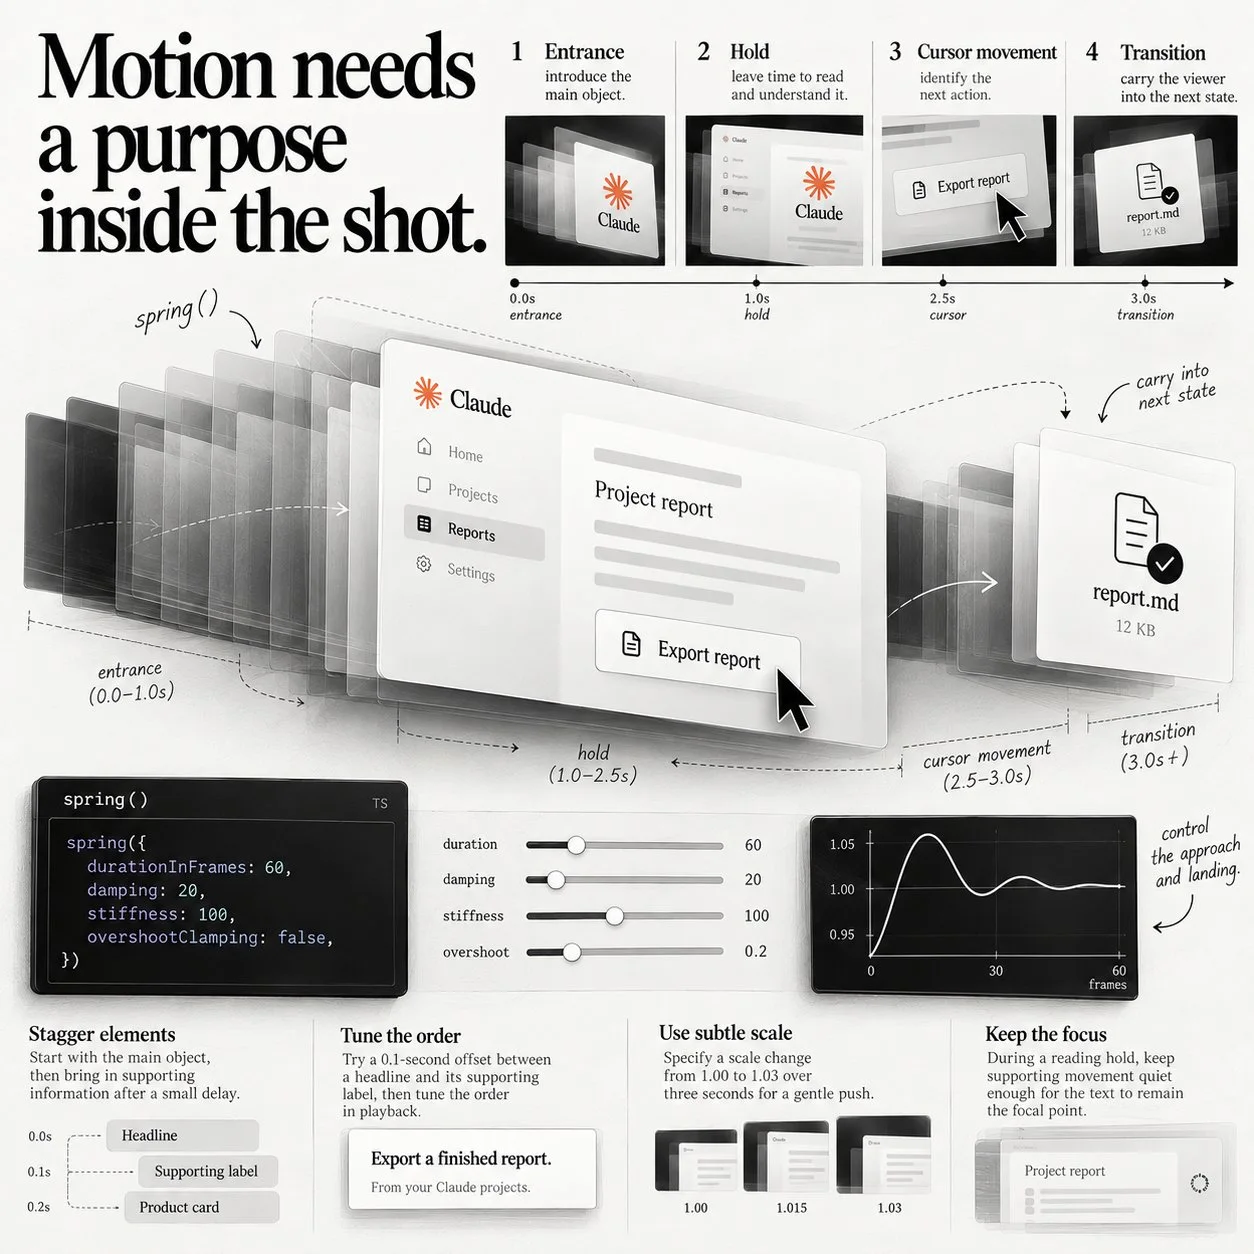
Four roles of motion and the spring adjustment panel. Image: @beamnxw.
Which scene "owns" the screen?
Keep attention on the button until there's a response, then let the result own the reading frame. If the pointer sweeps across the title as the card enters, delay an event or change the path. Calculate reading time from when the text becomes readable: a hold of eight frames at 30 fps gives the viewer only about 0.27 seconds. Play at normal speed and read aloud; if any hold ends before you finish reading, extend it, and check interface labels at phone screen size.
With fast-moving cards, decide what motion blur contributes to that particular entrance. According to Remotion documentation, the @remotion/motion-blur package duplicates frames multiple times then blends them to create realistic blur; check that text isn't getting smeared and trails aren't stretching unnaturally.
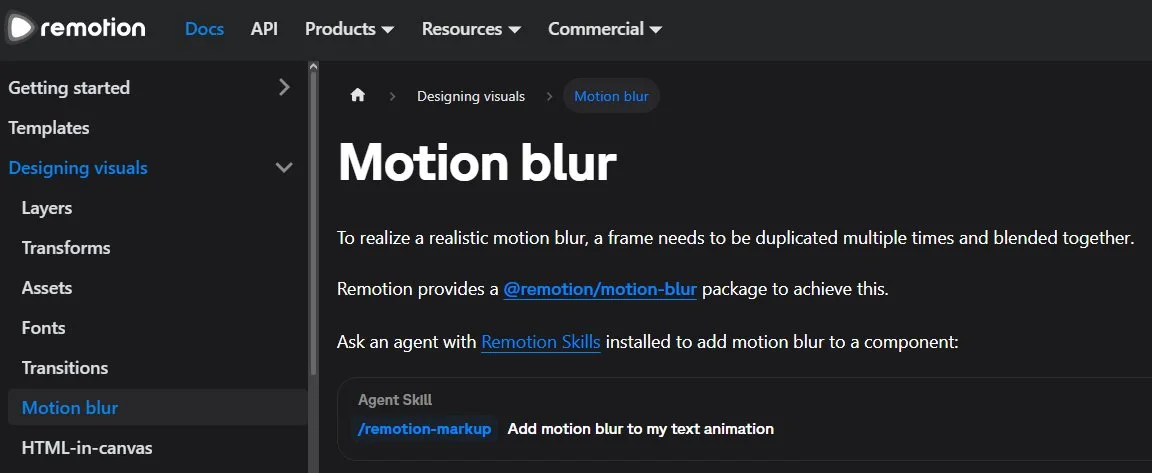
Motion blur page in Remotion documentation. Screenshot: @beamnxw.
Three static frames should guide the next round of edits
Before adding motion details, build three static frames: the opening frame, the frame showing the product result, and the closing card. Check that the main text reads clearly, the result shows well, no elements are cut off or overlapping, and the final call-to-action has enough space. Use these commands (adjust frame numbers if your result lands elsewhere):
npx remotion still Launch out/opening.png --frame=60
npx remotion still Launch out/product.png --frame=240
npx remotion still Launch out/closing.png --frame=540
To see how attention moves across scene boundaries, build the range around that spot separately. The --frames flag of the render command takes a range; for example, frames 90 to 149 is two seconds around the boundary between opening and product scene at 30 fps:
npx remotion render Launch out/transition.mp4 --frames=90-149 --codec=h264
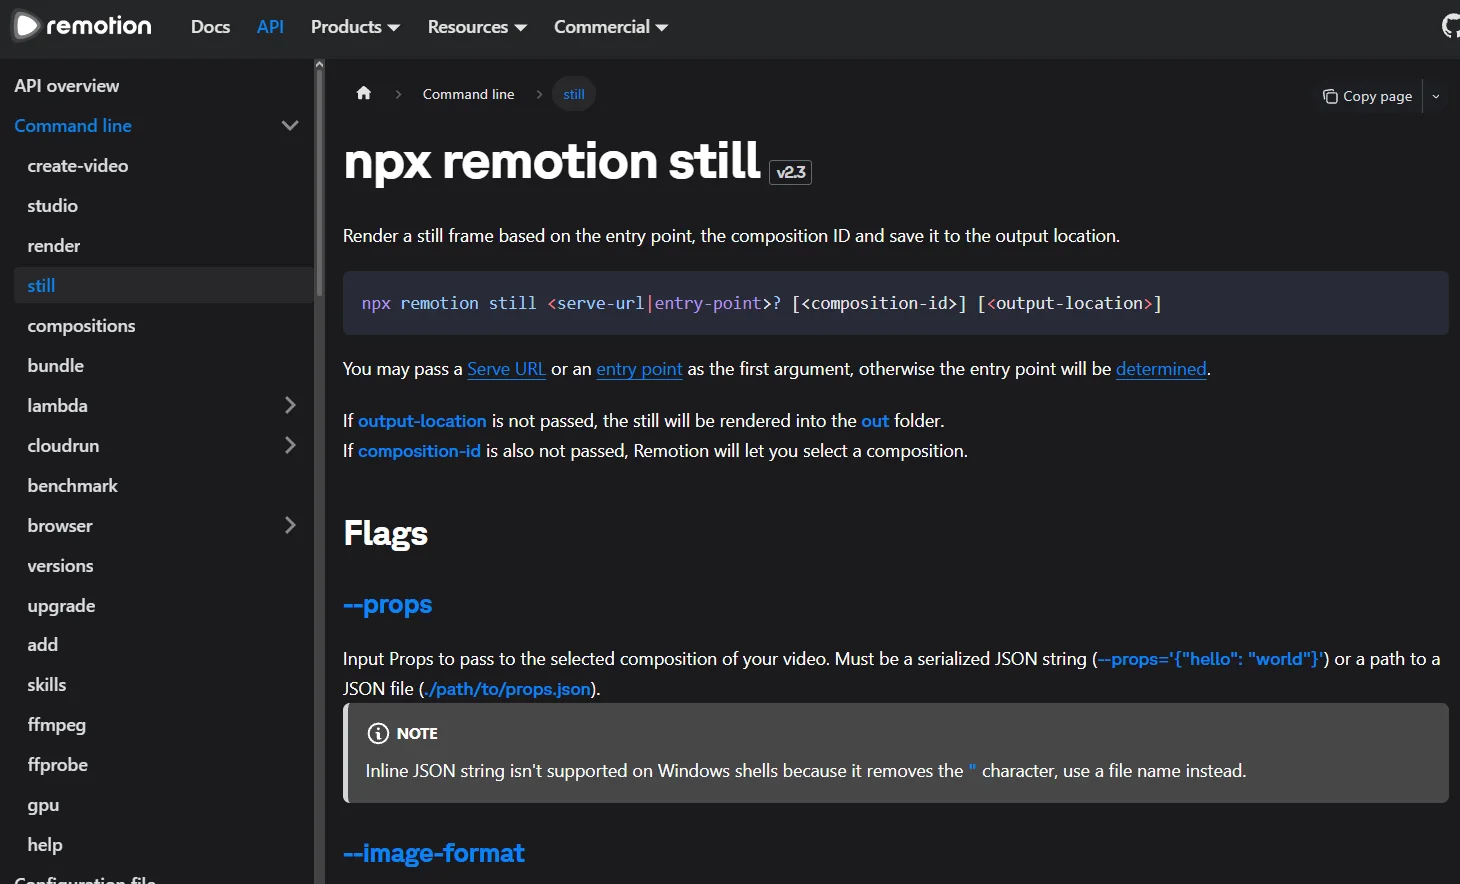
Command to render a single static frame. Screenshot: @beamnxw.
Give AI an Executable Fix Request
A good fix request has four fields: location, observed error, change, and what to keep unchanged. Fix in this order: missing information and illegible text first, then timing, then visual details. If you need an independent opinion, open another session with a summary, images and extracted frames, ask it to review up to five errors linked to frame numbers, then transfer the approved part to the building session.
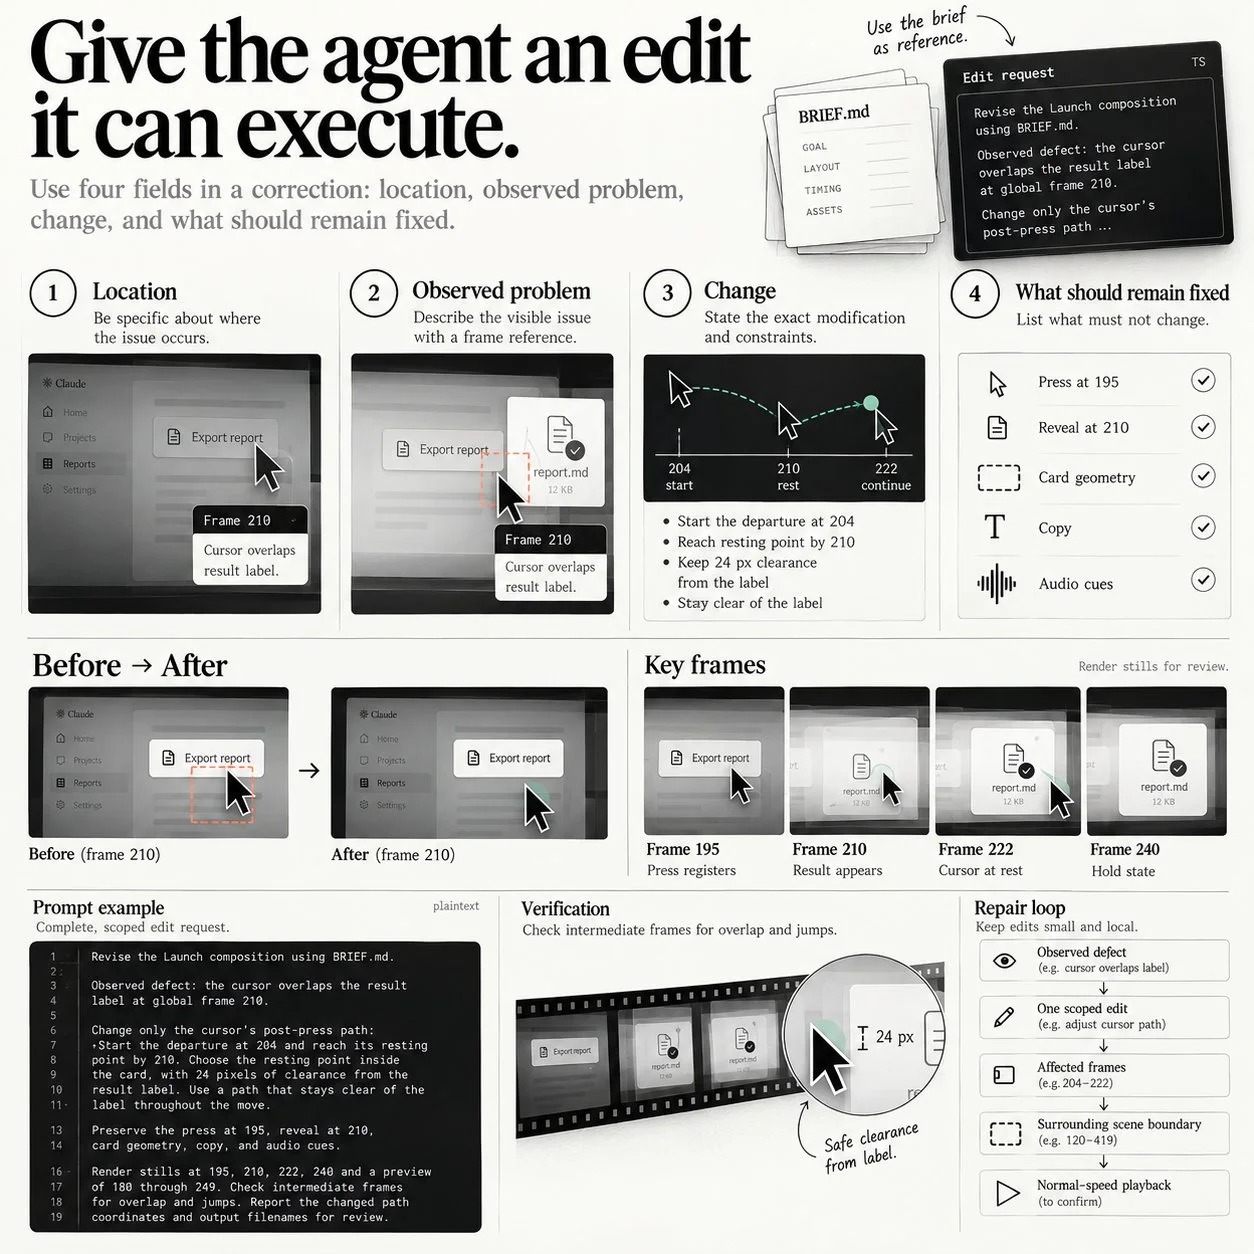
Four fields of a fix request, example cursor overlapping result label at frame 210. Image: @beamnxw.
Shortened example (translation of the original command intent):
Fix Launch composition per BRIEF.md.
Observed error: cursor overlaps result label at global frame 210.

Only change the cursor path after the click:
Start leaving at frame 204 and reach rest point before frame 210.
Choose rest point in the field, 24 pixels away from result label.
Path must not touch label throughout movement.
Keep click at 195, result at 210, field geometry, text and sound.
Keep cursor at destination until end of frame 419.

Build still images at 195, 210, 222, 240 and preview from 180 to 249.
Check intermediate frames for overlap or jitter.
Report new path coordinates and export filename for review.
An effective fix round is always local: observed error, one tight edit, affected frames, boundaries of surrounding scene, then playback at normal speed. Note clearly the local frame of the scene: local frame 30 in a sequence starting at global frame 120 corresponds to global frame 150 (per Remotion's <Sequence> frame translation).
Audio also has event frames
Place click sound right at the moment the click is visible, and the strongest emphasis of the sound reveal exactly when the result appears. Soft lead or silence at file start can shift the tap sound off the file start; use waveform and test playback to find the right point then offset it. List audio signals next to image events:
BUTTON PRESS      frame 195   click sound
RESULT SHOWS      frame 210   emphasis sound
HOLD END          frame 438   music fades
Keep sound and music on separate layers with adjustable position and volume, then listen at loudest, smallest signal still useful, and ending segment through both headphones and phone speaker.
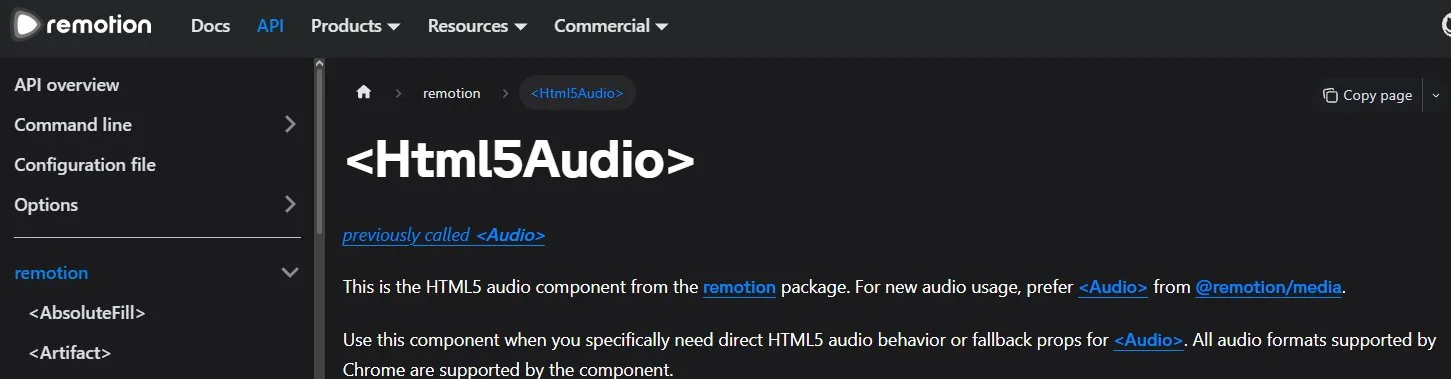
Remotion's audio component. Screenshot: @beamnxw.
Install tools and run from scratch
Install Node.js, Claude Code, FFmpeg and FFprobe before creating a Remotion project. The commands below match Remotion's Claude Code guide page (updated 22/10/2026):
npx create-video --yes --blank launch-video
cd launch-video
npx remotion skills add
npm run dev
Pick Claude Code from the skills installer, then in a second terminal in the launch-video folder, run the model with claude --model claude-opus-5-5 (Opus 5.5 model code as the original post notes). Per Remotion docs, installed skills go into .agents/skills folder and Claude Code works through .claude/skills link. Place product assets in public/, reference video at reference.mp4, summary at BRIEF.md, create frames/ for reference images and out/ for exports.
Extract reference video overview with FFmpeg (two images per second, 960 px wide, maintain ratio):
ffmpeg -i reference.mp4 -vf "fps=2,scale=960:-2" frames/ref-%04d.jpg
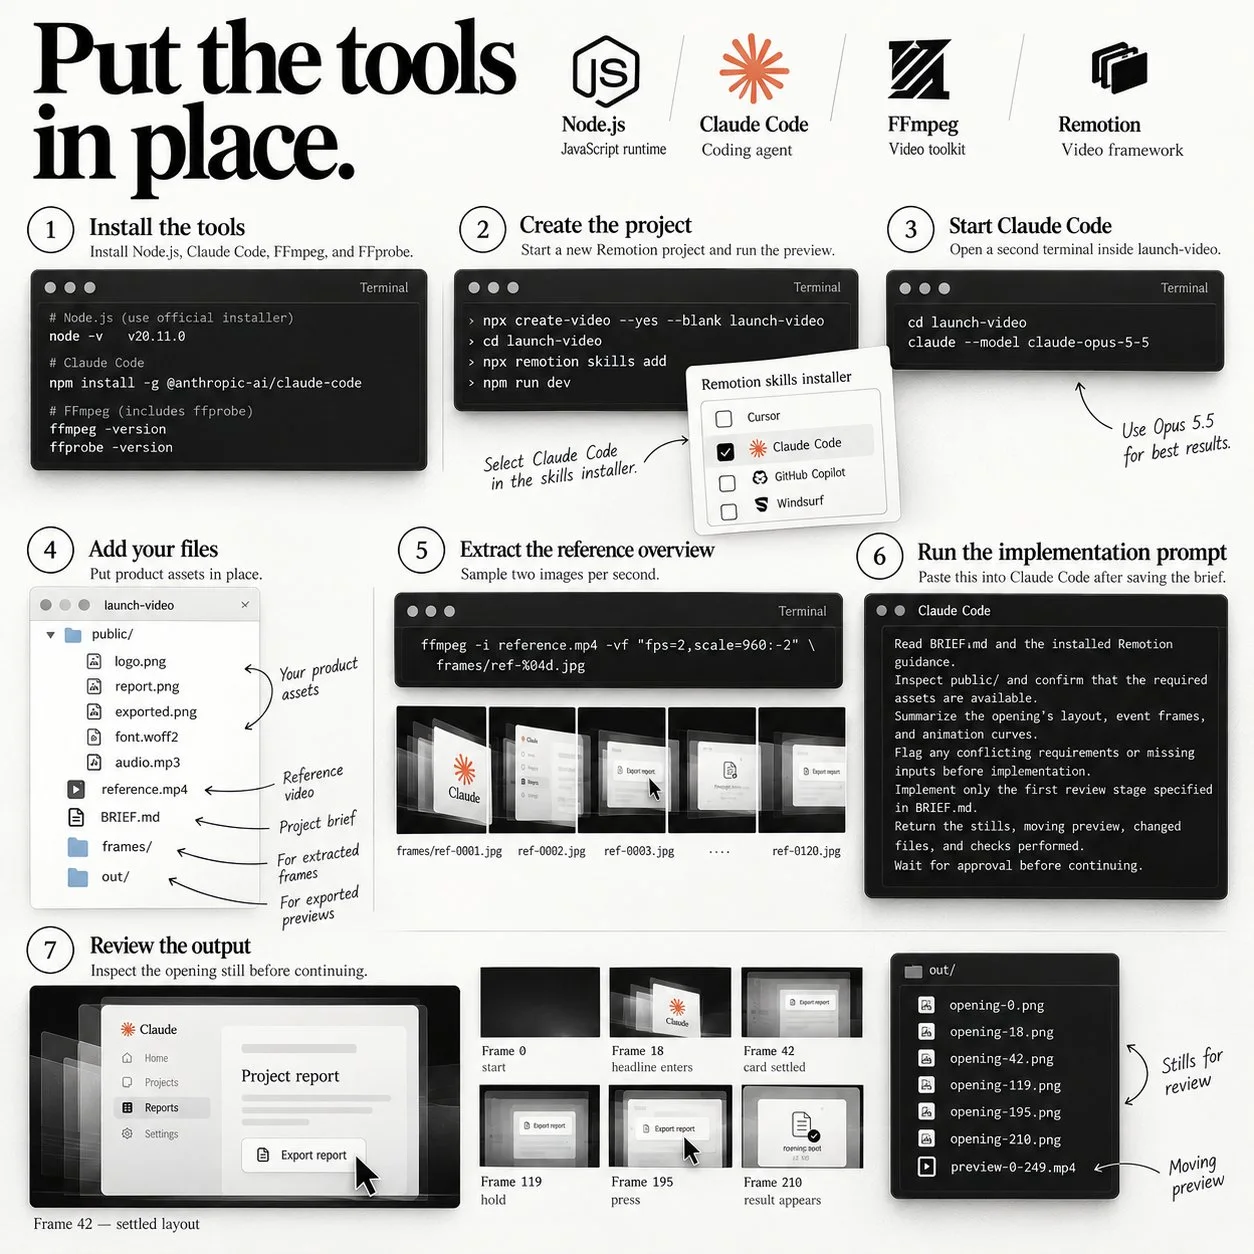
Seven setup steps from installing tools to seeing results. Image: @beamnxw.
FFmpeg filter docs used by the frame extraction command. Screenshot: @beamnxw.
After saving the summary, paste the first phase build request into Claude Code. Spirit of the original command: read BRIEF.md and the installed Remotion guide, check assets in public/, summarize layout, event frames and motion curves of the opening, state conflicts or gaps before working, only build the first review phase, return still images, preview, list of edited files and checks done, then wait for review. See opening image before requesting remaining scenes.
Exporting the approved film and checking the file
When image and sound have been approved, render the entire film, watch it at normal speed in sequence of opening message, product action, closing segment, then read the metadata:
npx remotion render Launch out/launch.mp4 --codec=h264
ffprobe -v error -select_streams v:0 -show_entries stream=width,height,avg_frame_rate,duration -of json out/launch.mp4
With a sample summary, I expect 1080 × 1080 pixels, frame rate 30/1 and around 20 seconds. I keep the approved version together with the summary, scene timecodes and sound signal list. With a longer film, I give each scene an entry state and an exit state: position, scale and the card's final highlight field is the starting state of the next scene; I keep background, color palette, spacing in common settings; I do each scene or small group, and if scene transitions overlap then I calculate the overlap into the total duration.
Turning the exercise into a saleable product: Launch Clip
The original assignment packages a 20-second exercise into a "Launch Clip" for a programmer about to launch a feature: shoot a real report, animate the export action, keep the finished file on screen, and the client receives a video to paste into the launch post or product page. The first package should be small: one feature and one approved script, one 20-second video at 1080 × 1080, one cover image taken from an approved frame, and one round of fixes on timing, words and sound.
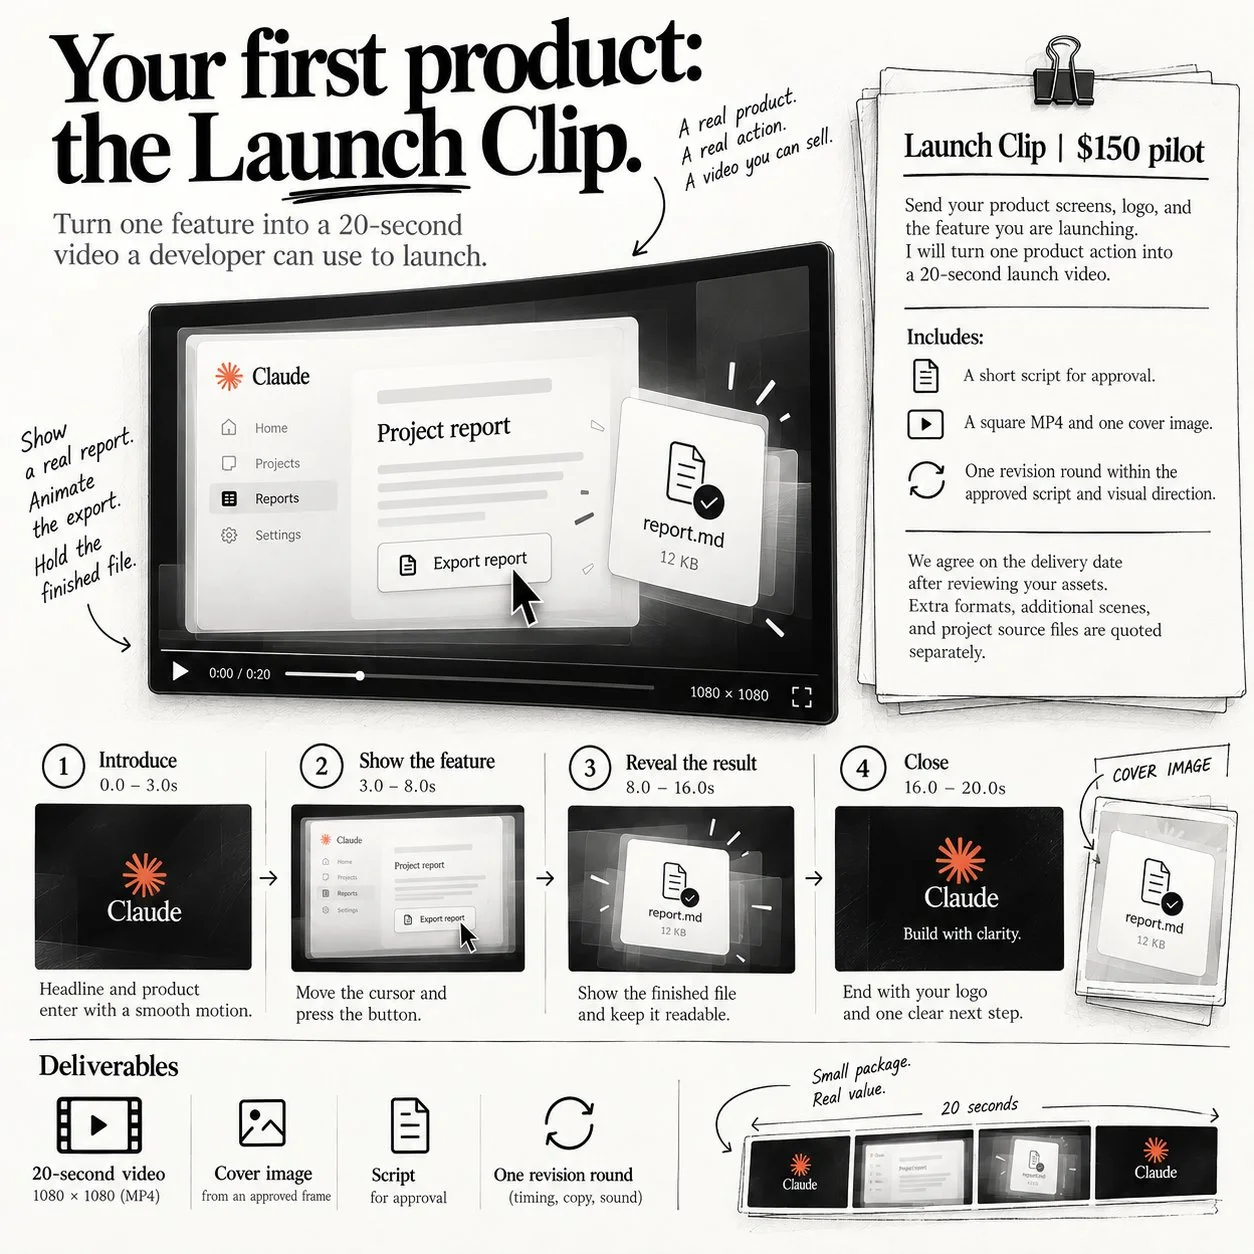
Launch Clip package: four segments of the 20-second clip and deliverables. Photo: @beamnxw.
I use 150 USD as a trial rate for illustration purposes to test the workload and client feedback. This is not a verified market rate, and this post does not guarantee anyone will buy at that price. Short pitch:
Launch Clip | trial rate 150 USD

Send me the product screen, logo and feature you're about to launch.
I turn ONE product action into a 20-second launch video.

Includes:
Short script to approve.
One square MP4 and one cover image.
One round of fixes within the script scope and approved image direction.

Delivery date agreed after reviewing assets.
Additional formats, extra scenes and source files quoted separately.
Make a sample before pitching
I make one complete example using my own assets or a product whose owner has agreed to use for illustration. I put the export next to the opening image, action and closing so clients see the finished product, and I time the whole job: asset prep, feedback, rendering, delivery. This real number tells me if the rate is reasonable.
Find a client with an upcoming launch
I pick a programmer with a working feature and release date. I identify one audience action they need to understand, then write a specific proposal, for example "your report export feature could be the whole 20-second clip". I send the sample and package details to a fitting client, ask which feature they want to demo. Before I start I agree on script, assets, deadline, payment terms and fix scope; I write clearly where the client can use the video and whether I can add it to my portfolio. While working, I send three still images to approve the direction, then a motion preview and final export; I tie feedback to frame numbers so the fix round has a clear list.
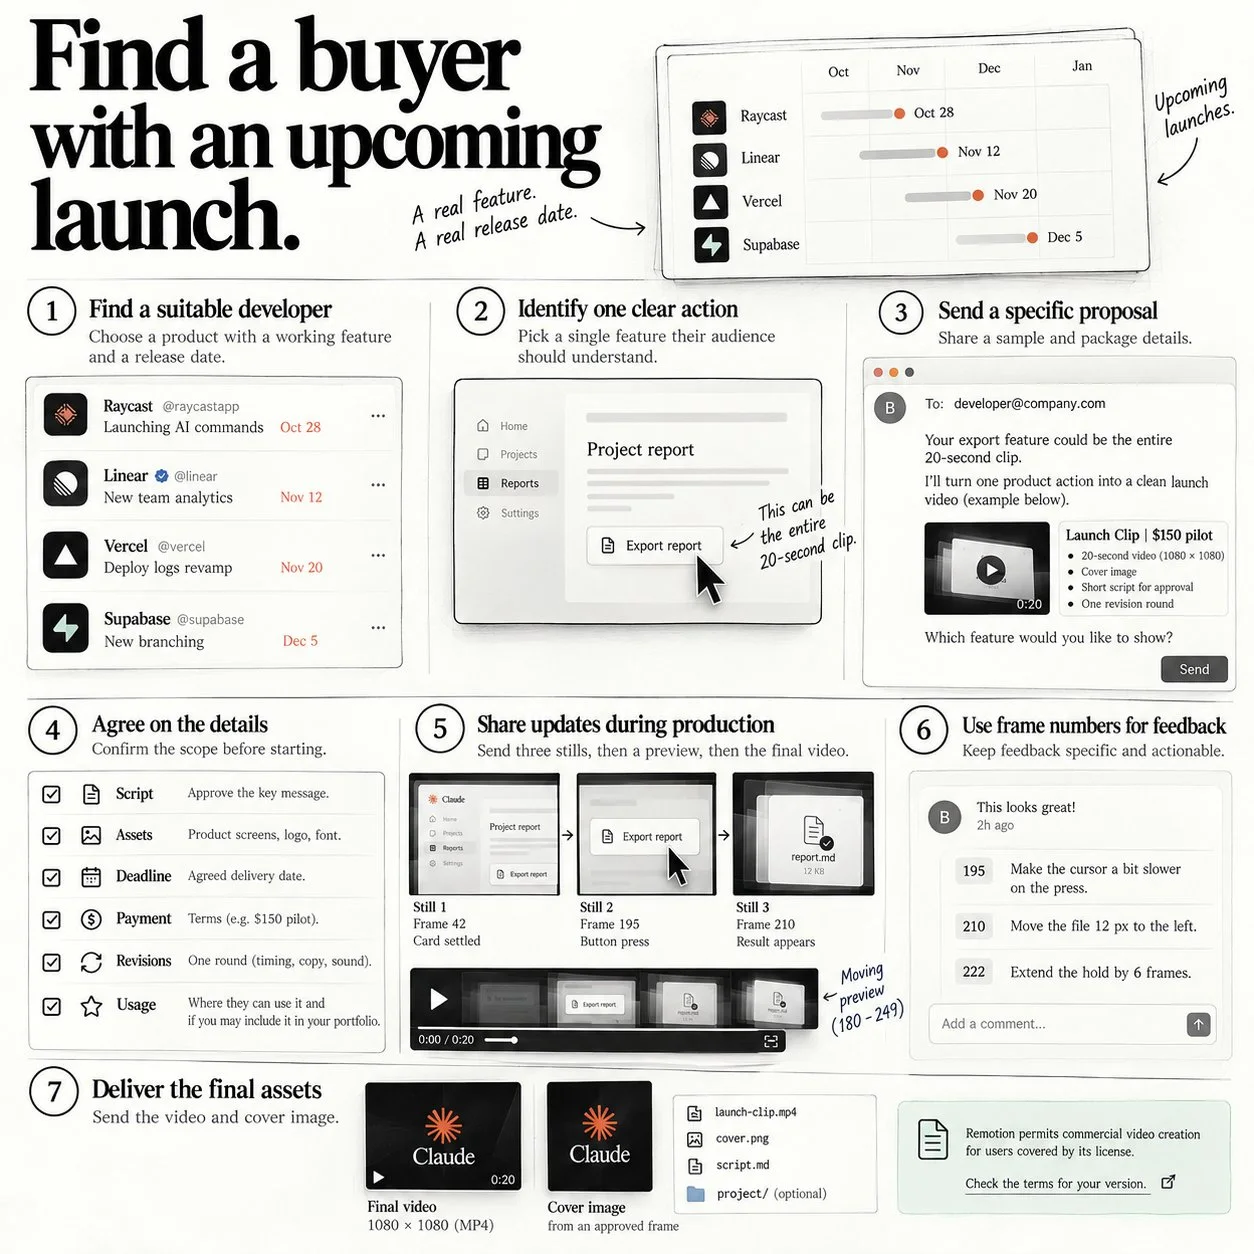
Seven steps from finding a client to delivery. Photo: @beamnxw.
Does Remotion allow commercial video?
Remotion allows commercial video, but it depends on license terms. I can use it free, per Remotion (license read 23/10/2026), in three cases:
- I am an individual.
- I am a for-profit organization with a maximum of 3 employees.
- I am a non-profit organization evaluating and not yet using commercially.
The license allows use to create video and images, including commercial, but forbids copying or editing Remotion code to sell derivatives. Larger organizations need a company license. For example, a freelance programmer selling rendered clips using Claude (Anthropic) for clients in the individual group, while an agency with 10 people would need to check company terms. I read the terms of the exact version I use before taking on contract work, since OPCAIOS does not offer legal advice.
Notes to Follow
There are six things to note when following this guide; the first and most important is about income, the last is about copyright:
- This is a guide, not an income guarantee: the $150 price and having clients are assumptions by @beamnxw. Try it yourself with your actual workload and feedback.
- AI estimates need checking: according to the original post, Claude's (Anthropic) position estimates are only approximate; always cross-check with cropped screenshots.
- Property rights: only use product screens, logos and music you have rights to use; record agreements in writing with clients.
- Don't copy references: use reference videos to learn movement decisions, then make original scenes with your own assets.
- Need hardware and time: complex scenes will render slower on regular machines.
- OPCAIOS experience: the diagrams and cover images of this blog are also built with code (written HTML then captured in Chrome without the interface). OPCAIOS has not yet built a Launch Clip following this process and has not checked the market for it.
If you're new to this, read more Motion graphics with Claude Opus 5.5 for how to set up a brand folder and reference library, Which AI model should you choose? to weigh costs, and AI writes code in the wrong version to understand why you should give AI reference materials.
Frequently Asked Questions
What is motion engineering?
It is a way to make motion video by specifying frames for each event, recorded in a summary, so AI or a code builder can do it right and fix each part without breaking others.
What do I need to install to build a product launch video with Claude and Remotion?
You need Node.js, Claude Code, FFmpeg and FFprobe, then create a project with npx create-video --yes --blank launch-video and install skills with npx remotion skills add. These commands match the Remotion documentation updated 22/10/2026.
What parts does a 20-second product launch clip have?
According to the original post: a short opening (frame 0 to 119), product section with cursor click and results appearing (frame 120 to 419), then closing scene with logo and a next action (frame 420 to 599), at 1080 × 1080 and 30 fps.
Why specify frame numbers for each event?
Because each value lets you fix one place without breaking another, and helps client feedback attach to a specific frame. At 30 fps, 0.6 seconds is 18 frames; at 60 fps over the same time it is 36 frames.
Can you make money making videos with AI?
Whether you can make money making videos with AI hasn't been proven for you yet. According to the original post by @beamnxw (9/10/2026), the Launch Clip package has a trial price of $150 for one 20-second clip, but that is an assumption to test, not yet proven, and OPCAIOS has not yet sold any package. To evaluate, do three things correctly:
- First, make a complete sample using your assets or the product owner's assets with their agreement.
- Next, time the whole real work: asset prep, feedback, building, delivery.
- Finally, send the sample to a programmer launching a feature and ask for feedback before pricing.
Example assumption: if total work takes 10 hours then $150 equals $15 per hour, not counting tax and other costs. To learn how to apply AI to real work, see OPCAIOS's AI application training course.
Source: post "Motion Engineering with Opus 5.5: Build Launch Videos You Can Sell" by @beamnxw on X, x.com/beamnxw/status/2108616740846420354, posted 9/10/2026; images from original post by request, owned by the author; this is a Vietnamese rewrite with comparison. Commands and features from Remotion (create-video, skills add, still, render --frames, spring, random, motion blur, licensing), Opus 5.5 info cross-checked against Remotion and Anthropic pages on 23/10/2026. The $150 price and possibility of having clients are the author's assumptions, not yet verified.
Translated from Vietnamese with AI. Read the original.
Want to apply this in your business?
Book a free 30-minute call (Vietnam time, in English or Vietnamese).